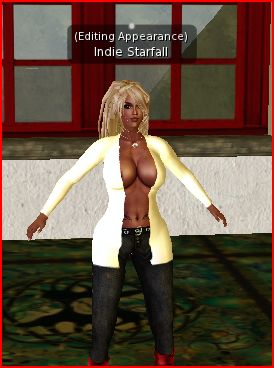
Clothing in Second Life® is comprised of up to
nine different pieces for different parts of your avatar. To create these various types of clothing, Linden Lab provides users with a set of Adobe® Photoshop® templates. Note that there are not individual templates for each type of clothing but a consolidated set. The following is a list of the clothing items and the corresponding templates used to create each item:
Upper Body Template
Both Upper and Lower Body Templates
Lower Body Template
- Pants
- Underpants
- Shoes
- Socks
Skirt Template
Download the Templates
Make certain that you download one of the following sets of templates. The current (7 Jan 2007) individual template downloads are missing some important elements that are referred to in my tutorials.
Template Structure
The clothing template files are structured to assist you in applying your artwork or textures to the appropriate section of the body without any gaps or seems. One thing to keep in mind when creating your clothing is that given the extreme customizability of Second Life avatars, it can be difficult to plan for every possible body type. Because of this, clothing that appears to look good on your own avatar may appear stretched or deformed on other avatars whose geometry is radically different.
Overlay and Background
These layers provide a solid template for the basic edges of where you textures should be placed. Colored edges are provided to help you match which edges attach to each other. The red line on the front will match with the red line on the back when attached to your avatar.
UV Map
A UV map is a technical term for a two dimensional (2D) blueprint for a three dimensional (3D) object. Why is it called UV? UV is actually an abbreviation for UVW which is simply the three letters that occur alphabetically before XYZ, which we all know are the axes that describe three dimensional space.
The lines on the UV map describe the connected shapes that combine to make your avatar three dimensional. When you re-shape you avatar, it is those lines, faces, and vertices which stretch and shrink. The UV map will help you accurately connect different parts of your clothing.
http://static.secondlife.com/templates/CMFF_Template_Set.zip
http://static.secondlife.com/downloads/avatar/avatar_mesh.zip
http://www.annotoole.com/CMFF/
These are some useful links to download the templates above. I found that time and patients is the key, and if mistakes are done..can be less expensive to scrap than RL material!! Some of my mistakes turned out to be Best Sellers in SL, so be creative!!! Why buy why we have all the tools to at hand in our viewers?..simple.
Can use these templates to make skins also which I found great.
If you have not created things in Second Life because graphics programs are expensive, then
GIMP may be the answer. GIMP is FREE, and has many of the same high-end features as programs like Adobe Photoshop. The best part is that GIMP has everything you need to create clothing for Second Life :)
So you have no more excuses.
Download a copy of GIMP and start making your own clothes for Second Life right now!
Or if you are a starter from scratch I found
Paint.net much simpler to achieve the same look, and its FREE. There is alot of fun playing with images and seeing them transported onto your avatar.
Most people use photoshop but I find it expensive, TIP:
Gimp will open PSD files; the templates you see out and about for photoshop will work in Gimp.
I found these Gimp walk throughs very helpful when I started using Gimp for the first time. Took alot of going round in circles untill I asked around. So try these out if you are using Gimp.
This is a tutorial on how to create a simple shirt in GIMP using the SL Avatar UV template from
Robin Wood. You can download the templates from
here. For this tutorial, you should download the "layered Photoshop (.psd) Files". You only need the "Top (2.4 MB)" file. These are the same template files I use for making clothes in Second Life.
This tutorial will cover how to use the Template to make a shirt, and how to export the shirt with Alpha Channel information for uploading to Second Life.
This tutorial is not intended as an in-depth GIMP tutorial. There are several excellent
books dedicated to this topic, not to mention the excellent GIMP
documentation and
tutorials. I do intend to show you step-by-step on how to use GIMP to make a shirt in Second Life.
So lets get started!

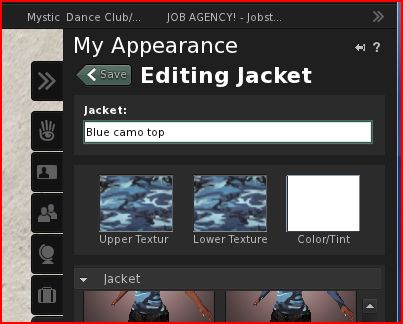
From "The GIMP" tool palette, select "File", then "Open". Look for the "SL Avatar Top Layers.psd" file on your computer. Click the "Open" button to open the Template file in GIMP.

This will open the Template file in a separate window.
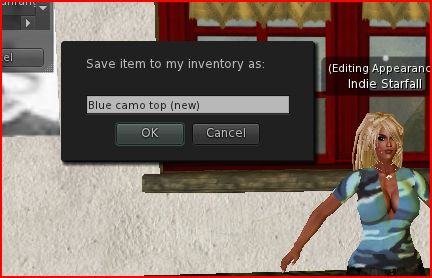
First, let's save a copy of the Template file so we dont accidently overwrite it (I cant tell you how many times Ive done this...:P) Select "File" from the top of the window, and "Save as...".

Enter a Name for the new file (something like "Little Black Top"). Click on the "+" next to "Browse for other folders" if you want to save it in a different folder.
Click on the "+" next to "Select File Type (By Extension)" to open a list of file types. Select "GIMP XCF image" and click on the "Save" button.
OK, now we can play with the file without worrying about messing up the original. :)
By default, the Template file is 1024x1024 pixels. This is great for detail work where you want the highest resolution to align the edges (such as when you are making skins or textures that need to be closely aligned). However, we are just making a simple top for demonstration purposes.
Also, we will be producing a Targa format file (with transparency information). This file will be huge at 1024x1024 pixels. So let's reduce the size to a more manageable 512x512 pixel file.
Click on "Image" from the top menu bar. Select "Scale Image...".

This will open the Scale Image window. Enter "512" in both the Width and Height textboxes (Height might change automatically when you enter Width). Under Quality/Interpolation, select "Cubic (Best)" (because we deserve the best :P). Then click the "Scale" button.
This reduces the resolution of the Template from 1024x1024 to 512x512 pixels.
Now we can start drawing.
First things first...I cant see anything :P Lets put a white background so we can at least see the Template.

Go to the Layers, Channels, Paths... palette. Click on the "New layer..." button.
(If you dont have the "Layers, Channels, Paths..." palette, click on "Dialogs" on the top menu bar, select "Creat New Dock >", and "Layers, Channels & Paths".)

Put "Backdrop" as the Layer Name (I dont want to call it "background" because that layer has a special meaning in Photoshop). In the "Layer Fill Type" select "White". Click on the "OK" button.

On the Layers, Channels, Paths... palette, click on the "Backdrop" layer to select it. Then click on the Down Arrow button ("Lower Layer") to move the "Backdrop" layer to the bottom of the list of layers.

OK, thats better. Now we are ready to work :) You might want to save a copy of this file as a starting point for your future projects...
The wonderful thing about these graphics programs is the ability to create different layers for different things. Dont be shy about creating new layers! They are there to make things easier. As you can see, the Template came with a number of layers already. We just added a layer as the backdrop to make it easier to see the Template.
We are going to create another layer to draw in our shirt.
On the Layers, Channels, Paths... palette, click on the "Backdrop" layer to select it. Click on the "New layer..." button on the left.

Enter "Shirt" as the Layer Name. For Layer Fill Type, select "Transparency" (because we dont want a background color on this layer). Click on the "OK" button to create the layer.

Go to the Layers, Channels, Paths... palette. Click on the Shirt layer to select it.
Make sure that the Shirt layer is below the SubDivided UVs layer, but above the Backdrop layer. If not, then click on the Shirt layer to select it, and use the Arrow buttons to move it into place.

From "The GIMP" tool palette, select the Lasso tool ("Select hand-drawn regions").

Draw a line all the way around the front side of the shirt (the figure on the left). Be sure you dont include any parts of the arm at the bottom.

From "The GIMP" tool palette, select the Paint Bucket tool ("Fill with a color or pattern").
Select "Black" as the foreground color. You can click on the Black and White Squares on the lower left of the foreground/background color squares to reset the colors.

With the Paint Bucket tool selected, click in the area you selected around the front side of the shirt. This will fill the selected area with black.

Now repeat the same process with the back side of the shirt (the figure on the right): select the Lasso tool, draw a line around the back side, selec the Paint Bucket tool, and fill the area with black.
Next, we are going to cut out an opening in the front and back sides for the neck. We are going to do this using the Path tool.

From "The GIMP" tool palette, select the Path tool ("Create and edit paths"). Make sure that the "Design" mode is selected at the bottom of "The GIMP" tool palette.

Using the Path tool, draw a path around the front side of the shirt (the figure on the left). It may help to zoom in on the neck area.
Simply click at each of these 5 points. Dont worry, if you dont get it quite right, you can go back and move one of these points around. Try to get the first 3 points on the Green line.

From "The GIMP" tool palette, make sure that the Path tool is still selected. Click on the "Edit" button on the bottom of "The GIMP" tool palette.

OK, this part is a little tricky...
Move your cursor over the Anchor Point in the middle of the neck. You will notice the cursor will change to a hand with a pointed finger. Left-click and hold on the Anchor Point, and drag the line towards the left. Dont let go yet!
Now press and hold the Shift key. You will see a mirror image of the line on the right side of the Anchor Point. Move your mouse around until you have a nice-looking neck shape.
OK, now you can let go of the mouse button and the Shift key.

On "The GIMP" tool palette, click on the "Create selection from path" button.
This turns the Path we just made into a selection.

Go back to the window where we have been editing the shirt. Click on the "Edit" menu at the top of the window. Select "Clear".
This will cut a hole in the shirt for the neck :)

Now, do the same thing for the back side of the shirt. Go to "The GIMP" tool palette, make sure that we are back in "Design" mode at the bottom. Then click on the 5 points around the neck.
Go back to "The GIMP" tool palette. Change to "Edit" mode at the bottom. Pull the middle Anchor Point to the left and press the Shift key to mirror it.
Go back to "The GIMP" tool palette. Click on "Create selection from path".
Go back to the window where we have been editing the shirt. Click on the "Edit" menu at the top of the window. Select "Clear".

So here is our completed shirt.
You can create additional layers and draw in additional designs. You can do that now or come back later after you finish this tutorial. I would recommend you run through this tutorial first though...
Its now time to prepare the Alpha Channel. The Alpha Channel provides transparency information for the file. In this case, we want everything in black to be opaque, and everything else to be transparent. By the way, white does NOT mean transparent! White is a color, just like black or any other color. We just happened to pick white to use as a working backdrop color. The Alpha Channel is a separate layer altogether.

Go to the "Layers, Channels, Paths..." palette. Click on the "eye" next to all the layers to hide them, leaving only the Shirt layer visible. When you are done, the Shirt layer should be the only one with an "eye" next to it.

Because we used a transparent background on our Shirt layer, GIMP automatically builds an Alpha Channel for us. To look at the Alpha Channel, go to the "Layers, Channels, Paths..." palette. Click on the "Channels" tab at the top. You will see a channel named "Alpha" with an outline of our Shirt in white.
Go back to the window where we have been editing the shirt. Click on the "File" menu at the top of the window. Select "Save" to save all of our changes.
Finally, lets export the file in Targa format...
Click on the "File" menu at the top of the window. Select "Save as..." to save all of our changes.

In the Save Image window, select "TarGA image" and click on the "Save" button.

The Export File window will appear. Just click on the "Export" button to continue.

The Save as TGA window will appear. Make sure you uncheck the "RLE compression" and "Original at bottom left" options. Click on the "OK" button to continue.
Thats it! The Targa file is now ready to be uploaded to Second Life.
The steps for uploading a Targa file to Second Life and turning it into a shirt was covered in
Creating Clothes Part 1 Tutorial. You can jump to the end of the tutorial, where it says "Next, go into Second Life..."
I just showed you the very basic steps in creating a clothing item in GIMP and uploading it to Second Life. Now, feel free to go back and change the shape of the Shirt. Add some layers and create some designs. Or play with some of the other clothing templates (SL Avatar Bottom, Skirt, etc).
Thank you for your Donation. Your Donation will be going towards Emergency relief Fund UNICEF.